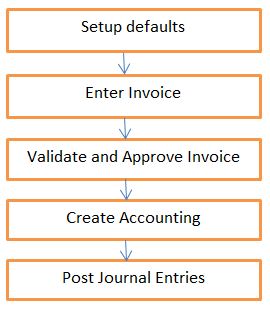
Training

For Online SCM Functional Training Please Contact -
Gmail # rishitechnologies9@gmail.com
Cell # 9071883639

Wednesday, May 16, 2012

Enable/Disable the Concurrent Program Parameters

HI Friends,

Here is the requirement.

1. I want to enable/disable concurrent program parameter based on other parameter value. Ex : If value for parameter1 is "Summary" i have to enable the parameter2 and if the value for parameter1 is "Detail" i have to disable the parameter2.

2. If user user select "Summary", i have to display the pop message, saying the "Please enter value for parameter2"

Step 1:

Create independent value set  "PARA_1" set for first parameter.


Step 2: Create one hidden dummy parameter (PARA_2 ) and create NONE value set and enter default value as

select decode(:$FLEX$.PARA_1,'Summary','Summary',null) from dual


Step 3:

Create third parameter which depends on value of first parameter.

For third parameter,create table value set and enter below condition in Where/Order By Clause.

WHERE :$FLEX$.PARA_2 = 'Summary'


Now test your concurrent program.


Step 4 : To Display Popup Message.

a). Create one dummy parameter.
b). Create special value set and attach this to parameter.
c). Pass some dummy constant value to parameter.


FND PLSQL "declare
begin
  if ':$FLEX$.PARA_1:NULL' = 'Summary' AND ':$FLEX$.TEST_9:NULL' IS NULL  THEN
  fnd_message.set_name( 'FND', 'FND_GENERIC_MESSAGE' ) ;
  fnd_message.set_token( 'MESSAGE', 'Enter Value for parameter 3' ) ;

 fnd_message.raise_error ;
  end if ;
END ;"

Now test your concurrent Program.


Thursday, May 10, 2012

How to Print record Number in XML Publisher

Hi Friends,

To Print record number in XML Publisher report output, Use function called position().


Issues With Profile Values Retrieving

Hi Friends,

Today i came across one issue.

i have changed the profile value "Concurrent:Report Copies" from 0 to 1 and i am trying to retrieve the profile value by using  select  fnd_profile.value('CONC_COPIES') from dual; . But still sql query is showing old value as 0.

Solution : Once after updating the profile value, open new toad session to get latest value.

Wednesday, May 9, 2012

How to cancel Scheduled Concurrent Programs

Use below query to cancel scheduled concurrent programs.

UPDATE fnd_concurrent_requests
SET phase_code = 'C', status_code = 'X'
WHERE status_code IN ('Q','I')
AND requested_start_date > SYSDATE
AND hold_flag = 'N';

COMMIT;

Tuesday, April 3, 2012

R12 - Oracle Payables Part - 1


Overview Of payable :


1. Supplier / Creditor Master Creation :

Please refer my earlier post :

http://oracleapps99.blogspot.com/2011/08/r12-supplier-creation-part-1.html
http://oracleapps99.blogspot.com/2011/08/r12-supplier-creation-part-2.html

2. Invoice Creation :


2.1 Setup Defaults:

  • Define defaults to speed up data entry.
  • Defaults can be overridden at Invoice level if required.
  • for Ex : define payment terms, to auto-assign multiple payment schedules and discounts when we enter the invoice using this payment term.
  • Define paygroup, to o classify each invoice - Pick one Pay Group and pay all related invoices at one shot.
  • Define Distribution Sets, to auto-create multiple invoice lines with pro-rata amounts when we enter the invoice 
refer my earlier post for setups :


http://oracleapps99.blogspot.com/2012/03/r12-ap-payment-setups.html
http://oracleapps99.blogspot.com/2012/03/r12-ap-invoice-setup-1.html

 2.2.  Enter Invoice :

We can enter 9 types of invoice by using invoice entry form.

Type Of Invoices :

Standard
Credit Memo
Debit Memo
Expense Report
Prepayments
Retainage Release
Transportaion Invoice
Withhold Tax
Mixed.

Create Standard Invoice.

Invoices --> Entry --> Invoices

Enter Invoice Header details, like

Operating Unit, Type, Supplier / Trading partner name, Supplier name, Invoice amount Etc.


 Click on 2 Lines Tab and enter line details like amount and save.


Click on Distributions Button  --> save


come back to like and click on line  --. System will calculate the tax based on your tax setup.


Click on All Distributions Button to see the complete distribition information.


2.3 Validate Invoice :

Actions --> Validate --> select Validate check box --> Ok.


and also we can see the reason from Holds Tab.  we can see all the holds and hold releases information for the invoice.


correct the invoice amount and validate the invoice --> Actions --> Validate -->  select Validate check box --> Ok.

 Click on View Payments Tab to see the all the payments for the invoice.


 Click Scheduled payments Tab to see all scheduled payments. In our example, we created invoice on 04-Apr-2012 and Invoice Due date / Payment dare also 04-Apr-2012. System will calculate the invoice due date based on payment terms and in our case we used payment terms as "LS Terms". Lets a look into payment terms.


Technical part :

select * from AP_INVOICES_ALL where invoice_num = '04-APR-2012_1';

select * from AP_INVOICE_LINES_ALL where invoice_id = 211325;

select * from AP_HOLDS_ALL where invoice_id = 211325;

select amount_remaining, due_date, hold_flag from AP_PAYMENT_SCHEDULES_ALL where invoice_id = 211325;


SELECT distribution_line_number, line_type_lookup_code, amount, po_distribution_id, amount_to_post from AP_INVOICE_DISTRIBUTIONS_ALL  where invoice_id = 211325;


Friday, March 30, 2012

R12 - AP Payment Setups

1. Interest rates :

In the Payment Interest Rates window, you define interest rates Payables uses to calculate and pay interest on overdue invoices. Payables calculates interest on overdue invoices only if you enable both the Allow Interest Invoices Payables option and the Allow Interest Invoices option for the supplier of an invoice.

(N)>Setup>Payments>Interest Rates

 select * from AP_INTEREST_PERIODS;


2. Bank Charge Calculation :


Use the Bank Charge Calculation window to specify charges associated with transferring money between banks. If you use Payables you specify charges between your remittance banks and your suppliers' banks. If you use Receivables you specify charges between your customers' banks and your banks. You can define charges.

 (N)>Setup>Payments>Bank Charges Calculations.


 select * from AP_BANK_CHARGES ;

select * from AP_BANK_CHARGE_LINES;

3. Bank and Bank Branches Creation  :

(N)>Setup>Payments>Bank and Bank Branches.


Click on Banks --> Create


Click Save and Next -- > Click on create to create Bank Address --> Enter required fields and click on Apply.


Click Save and Next  -->  Click on Create Contact to Create contact person/info --> Enter all the required info. We can create any number of contacts by clicking on Add Another Row.
 
Click on Finish.


 Click on Create Branch to create Bank Branches.


Thursday, March 29, 2012

R12 - AP Invoice Setup - 1

Hi Friends,

Today i am posting required setups related to Account Payables.

1. Payment terms : We define payment terms that we can assign to an invoice to automatically create scheduled payments when we submit Payables Invoice Validation for the invoice. we can define payment terms to create multiple scheduled payment lines and multiple levels of discounts. Payment terms have one or more payment terms lines, each of which creates one scheduled payment.

Setup>Invoice>Payment Terms


Underlying tables.

select * from AP_TERMS where name = 'XX_TERM' and term_id = 9999;

select * from AP_TERMS_LINES where term_id = 9999;

2. Distribution Sets :

Use a Distribution Set to automatically enter distributions for an invoice when you are not matching it to a purchase order.
We can assign a default Distribution Set to a supplier site so Payables will use it for every invoice you enter for that supplier site. If we do not assign a default Distribution Set to a supplier site, we can always assign a Distribution Set to an invoice when we enter it.

(N)>Setup>Invoice>Distributions Sets

 For Ex : Create an invoice and assign above created distribution set.


Click on Distributions button. verify the amount is distributed onto two accounts based distrinution set.


 select * from AP_DISTRIBUTION_SETS where distribution_set_name = 'XX_NAME';

select * from AP_DISTRIBUTION_SET_LINES where distribution_set_id = 9999;

3. Tolerances :

Use the Invoice Tolerances Template window to define the matching tolerances we want to allow for variances between invoice, purchase order, and receipt information. we can define both percentage-based and amount-based tolerances.
Tolerances determine whether Payables places matching or tax holds on an invoice. When we submit Payables Invoice Validation for an invoice that we have matched to a purchase order or receipt, Payables checks that the invoice matches the purchase order or receipt within the purchase order matching tolerances you define.


(N)>Setup>Invoice>Tolerances 


 select * from AP_TOLERANCE_TEMPLATES where tolerance_name = 'TEST_9';

4. Hold and Release Names : 

Use the Invoice Hold and Release Names window to define the names that we use to manually hold or release invoices. We can define hold names that we assign to an invoice during entry to place the invoice on hold.

(N)>Setup>Invoice>Hold and Release Names

 select * from AP_HOLD_CODES;

5. Pay Group :

Pay Groups are used to classify each invoice - Pick one Pay Group and pay all related invoices at one shot.

Setup -->  Lookup  --> Purchasing


Tuesday, March 27, 2012

R12 - Fixed Assets Overview

Hi Friends,

Today i am posting Overview Of Oracle Fixed Assets.

R12 - Cycle Counting

What is Cycle Counting?

Cycle Counting  is a process of periodic counting of individual item / all the items  throughout the course of the
year to ensure the accuracy of inventory quantities and values.

We can do the cycle counting at Organization / Sub Inventory Level.

What is ABC Analysis?

ABC analysis is used determines the relative value of a group of inventory items based on a
user-specified criteria. "ABC" refers to the rankings you assign your items as
a result of this analysis, where "A" items are ranked higher than "B" items, and so on.

1. Define ABC Compile

ABC Codes --> ABC Compile ( Select Organization for which you are planning to compile the items. Ex : M1 ).  --> Click on New

Enter the name and scope of compile ( organization or inventory level ) and enter the criterion.

Click on Compile. system will compile / calculate the number of item within the organization and value of the items.

2 conc prorams will run in back end " Compile ABC analysis" and "ABC descending value report".

Open the output of ""ABC descending value report",we will find the items information within the organization.


2. Define ABC Classes.


In the above example i have created  LS_A , B , C Classes. That means, all high volume / value items, we have to assign to LS_A Class, all medium volume / value items to LS_B Class.

3. Define ABC Assignment Group.

ABC Codes -->  ABC Assignment Groups    

Create New Group "TEST_ASSIGN_GROUP" and assign earlier created ABC Compile called "TEST_COMPILE" to this Group.


Click on Group Classes Button, to assign earlier created ABC Classes to this Group.


Click on Assign Items Button, Assign all the items from compile "TEST_COMPILE" to these 3 classes and save. Once save the records, in back end conc program "Define ABC assignments" will run.
( "ABC descending value report" will display items in descending order based Quantity and value). In our example i am assigning top 10 items to the class LS_A and top 11 to 99 items to class LS_B and renaming to class LS_C.


4. Define Cycle Count .


Counting --> Cycle Counting --> Cycle Counts.


Click On New to create new cycle count for organization M1.


Check the check box called Auto Schedule to schedule the counting.


Click on Adjustment and ABC Tab and assign ABC assignment Group Name and save. Once we save the record, in back end Conc. Program "Initialize cycle count items" will run.


Click on Classes Button and enter number of times we are planning to count the items from ABC Classes per Year and save.


Click on Item Button ( in Adjustment and ABC Tab ) and all the item from ABC Classes are populated automatically.
 5. Manual Scheduling of Cycle Counting.

We can schedule all the items from cycle count or only few items from cycle count. for our demo purpose i am scheduling Item "MC31324 ".

Counting --> Cycle Counting --> Cycle Counts  --> Search for "TEST_COUNT" and click on Schedule Button

Or

Counting --> Cycle Counting  --> Manual Requests --> Enter Cycle Count name and click on find.
Enter Item Name and save.


 6. Request for Cycle Counting.

Open Cycle Count Form and Query with Cycle Count "TEST_COUNT".  Go to Tools --> Cilck on Generate Count Requests.  In Backend "Generate cycle count requests" Program will run.


Open Cycle Count form and Query With Cycle Count "TEST_COUNT" and click on Counts Button to see the on hand Quantity of the item in system. In our Example, on hand Qty in system for Item "MC31324' = 50000.


Cross verify the on hand of the item.

on-hand Quantity, Availability --> On-hand Quantity and search with item "MC31324".

7. we have to do manual counting for Item "MC31324" in organization "M1".

After counting the item manually in M1, we found that on hand qty of the item is 50090. that means 90 items are less in oracle inventory system. So we have to do adjustment for that item in system to synchronize the system OHQ and Actual OHQ

8. Adjustments.

Open Cycle Count form and Query With Cycle Count "TEST_COUNT" and click on Counts Button and click on Adjustment Tab and enter Count Quantity = 50090 . ( System will update the Adjustment Quantity = 90 ) and Save.


9. Verify the OHQ On the Item. Now OHQ in System  = 50090.